In this article we share recommendations from established artists for best practices for having a profitable year. The tips outlined here are tried and true suggestions for how to organize your small business for selling your work. The timetables and examples provided serve as suggestions, but by following this type of workflow, it will help you to organize yourself for selling online.
This article covers topics like: scheduling, marketing, and pricing. Most importantly, we delve into how to create a workback schedule for selling. By starting with your delivery date and then working back through each of the steps you need in order to sell your work, you give yourself ample time to create, market, sell, and ship your work–taking a lot of the stress and guesswork out of selling.
Identify Key Selling Points Throughout The Year
For some, a store is a year-round focus, for others, their sales are structured around key events–like arts markets, exhibitions, or trade shows. Regardless of your business model, creating a calendar of key selling dates to structure your promotions calendar is a great idea.
Depending on several factors, your key dates can vary widely. For artists based in Canada, here is a sample of some key dates to build your schedule around when starting in the autumn season:
- Winter holidays Sale Promotion: Nov. 1 – December 13
- Valentines Cyber Promotion: Jan 16 – Feb 1
- One of a Kind Show: March 27-31
- Toronto Outdoor Art Show: July 5-8
- End of Summer CyberSale/Open Studio: August 19-30
- August next year: start building up inventory for upcoming holiday season
A really common practice is to plan sales around major holidays when people are looking for unique gifts. For the purposes of this article, we use Christmas as an example. We all know that November and early December are the key buying times for seasonal holidays like Hanukkah, Kwanzaa, and Christmas–but did you know that website planning should start in August and September in order to deliver for those key holiday sales dates?

Create A Workback Schedule
Workback schedules are just what they sound like–starting with your end date and working back with key deliverables on your project, figuring out the time you need to complete each task–until you work back to your starting point. The dates in this article can serve as an estimate or suggestion.
Your own workback schedule will depend on different factors like:
- the time it takes you to produce your work
- time for any external production (like printing or framing)
- where you are located vs. where you ship your work
- and more.
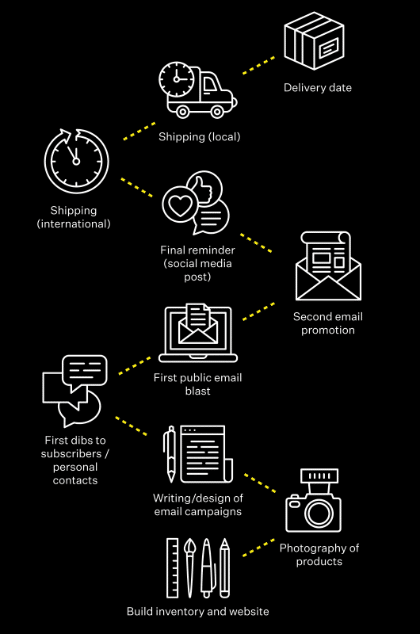
We created a mock schedule to show the types of delivery dates you should consider in order to create your own work back schedule.
Plan For Shipping
If your delivery date is Christmas, you’ll want to set your last possible delivery date a few business days before that. This is good practice to account for any last minute shipping issues. With this in mind, your last possible shipping delivery date is December 20th. You also want to factor in that shipping is slower around the holidays. Based upon this, we recommend allowing at least a week for local shipping and at least two weeks for national and international.
This is what the breakdown could look like:
- Local Shipping: ship at least 1 week in advance = December 13
- International shipping: ship at least 2 weeks in advance = December 6th
So this means that for local clients, your cut off date for orders is December 13th, and for international clients it’s December 6th.

Marketing Your Sale
The next step in your work back is Marketing–email blasts and social media posts. You need ample time for promotions in order to let customers consider. It can also be helpful to send a few targeted reminder emails or posts to remind people of your cut off dates for orders.
Whenever you do an email, follow up with a social media reminder as well. Depending on where your audience is, this could be an Instagram post or story, tik tok, or FB post. Some channels, like Instagram, give you the ability to add calendar reminders to your posts or a countdown clock for sales and promotions.
In this mock email and social media marketing schedule, the dates would be as follows, beginning with the date of your final reminders:
- December 12: Last call / final social post. Alert your social media following and the general public that their last day to order, for local delivery only, will be Dec 13th. This is a good time to take advantage of any countdown clocks available within the social platform.
- December 6: Final reminder email. This last email Subject: Last chance sale for local deliveries. Be sure to let your email contacts know their final order deadline for local delivery will be on Dec 13th.
- November 29: Email and social media. Post your fourth social media reminder and second email reminder. An example email Subject: Reminder for last chance National and International deliveries. In both, inform people that the last day to order for National and International delivery will be Dec 6th.
- November 22: Email and social media. On this date, share both your third marketing social media post and the first reminder email to your mailing list. At this point, you might consider highlighting a specific product. Graphics used for this email should be unique from the early access email.
- November 15: Promotion on social: In your second marketing post on social media, remind followers the store is open.
- November 7: First public promotion on social. This date will be your first marketing post on social media about the store being open to the public. The goal of this post is to bring in new clients.
- November 1: Private email to mailing list/subscribers/personal contacts. Give your private mailing list one week in advance of the general public. This email early access is a way to reward people who have purchased from you before, or who took the time to subscribe to your site. The email could include a discount and/or early access to the items for sale. This early access can also allow people to consider their gift needs and plan ahead.
Any social media posts made outside the outlined dates should not reference selling. If you are someone who posts daily or a few times a week, it is best to stick to your usual type of content rather than inundating your audience with posts specifically about selling your work. Your standard posts are part of why they follow you in the first place!
Now that we have the workback schedule for marketing, it’s time to go back a little farther and determine the dates for creating your marketing assets and setting up your online store.
- October 25: Writing and design of email campaigns. By this date, if you haven’t started already, begin creating your graphics and deciding which images of your work will be featured in your social posts and emails. It is also important to write the emails and captions for social media now, so that writers block won’t delay your marketing schedule.
- October 11: Photography and preparation of products. Allow roughly 2 weeks to finalize photo editing of products, adding them to your store, creating promotions within your website, etc.
- September 13: Build inventory and update website. By this date, if you haven’t already started, use the next month to produce, print, etc, and make sure you have your desired inventory of work ready to sell. This is a good time to take a quick look at your website and make sure the images on your homepage reflect your current body of work.
Now that you have your workback schedule settled, here is a quick summary of the Marketing Materials needed:
- Four emails; two that are unique emails, the early access for subscribers and the one highlighting an item in your body of work, and two that are essentially the same. These two similar emails are the “last chance” reminders for local delivery and for national/international delivery.
- Four to six social posts: The final two will announce “last chance” for local delivery and for national/international delivery; the other will announce and then remind followers your store is open. These could include examples of your work, short scrolls of your online store, or graphics with dates. Keep your captions clear and include important dates or other information.
Best Practices For Emails
These will be going out to your mailing list, contacts–people who have shown an interest in your work. Your mailing list will have some knowledge of you so offer some details/updates that will re-engage them. Instead of making this email business-like and purely about sales, tell them a little bit about the behind the scenes of your work. Another idea would be to offer a reflection on the year you’ve had.
Thank your mailing list for their continued interest in your work and connect this to offering a special deal on your holiday sale–do they get early access to your price list to make selections? Do they get a discount? By rewarding those who have shown interest in your work, you encourage them to stay tuned to your site and social as well as encouraging repeat sales.
Don’t feel like you have to go too Christmas-y with your aesthetics, unless it makes sense with your work. It’s a time of year when it seems that everyone is putting a holly banner or a pine tree on their graphics. The same advice pertains to other holidays which are affiliated with gifting, selling your work, and promotions.
Some artists take different tactics, finding ways to make work they enjoy and in their style that fits the seasonality–for example, a landscape painter within our community did a special series of winter scenes and promoted these over the holidays. A portrait photographer focused on sales of family photographs, typically in high demand during this season.
Whether the expected items reflect your holiday experience or not, ask yourself “How can my visuals stand out?” Then create unique visuals/design for each email/post in your series for the event so that each communication seems fresh.
Best Practices For Social Media
Similarly to your email graphics, the visuals for each social post should look unique (i.e. a different photo/piece featured in each post.) To keep things cohesive, come up with a connective graphic or banner letting your audience know this content is related to the sale. Consider formatting your images with minimal text about your sale, or a banner that goes over part of the image. Having unique pieces featured will keep posts fresh and boost interest in different works you have for sale.
For your final posts, be explicit with language about your cut off dates for shipping. This will help to capture those who have been considering buying something. Add a sense of urgency with these reminders. For example: One week left to purchase for local deliveries.
If you use Instagram, you could even use countdown timers on stories; start posting previews of work that will be for sale and make an event about the release of works for your holiday sale.
Some artists only sell through studio sales at specific times of year–this creates a sense of scarcity around their work to their social media following. Their sales become events with countdown times and event reminders baked into their social media promotions.

Pricing Your Work
There is no set formula for pricing your work. However, there are always a few things to consider when determining how to set your prices. These will help you come up with a base value for your average pieces, and from there you can work out a calculation for works of other sizes or finishes.
These are the most important things to consider when determining your pricing:
- The cost of your materials/production.
- Your cost for marketing and packaging.
- The cost of your time to produce the work.
- Other business expenses, such as a studio space, online portfolio website, and more.
You should generally factor your time more heavily for one-of-a-kind products, such as original paintings, as compared to dividing that time for products like a photo print or printed copy of an original work, which can be editioned and sold several times.
Aboveall, make sure you don’t sell yourself short–too often, emerging creatives value their work so low that they aren’t making a return on their investment. Reflect on your own time and costs and compare these with some research on how your colleagues and members of your creative community are pricing their work.
When first trying to figure out how to price your work, it is helpful to look at the price lists when visiting gallery exhibitions of other emerging artists and to look at the value placed on work on sites like Artsy. Find out what your equivalent market would be and start figuring out a base price. Once you determine a base price for your art, you can utilize a pricing calculator to set prices for the rest of your work.
Pricing Calculator Example: If your average painting size is 18 x 20 and you are pricing this piece at $500, you can set a price by inch for your work.
18 x 20 = 360 sq inches 500/ 360= $1.38 per sq inch
9x 12 = 108 sq inches x $1.38 = $150 selling price
Of course, you can use this calculation as a starting point and then round your pricing up or down to make sure there is consistency.
Connect Your Promotions With Your Website
It makes a lot of sense to connect your promotions with your actual website. Before you begin this process, give your online portfolio website a quick review to make sure it is ready to give visitors a clear idea of who you are as a creative professional and what you create. The better the experience when visiting your site, the more likely people are to make a purchase, and to continue to come back to see more of your work later.
Track Your Contacts With A Custom Landing Page
Growing your business is connected to growing your audience and contact list. Social media is a big piece of this, but once you get people to your site, use a Mailing List and/or Pop ups to capture their info. Making a special landing page that talks about your sale is a great place to add a mailing list in-page sign up or pop-up. If you are offering discounts to your current mailing list subscribers during this online store opening, add language to the mailing list sign up to share that detail. Letting people know that they will get a discount code for the sale when they sign up will add a sense of urgency and can lead to more sign ups for your list.
When creating a custom landing page with info about your sale, we recommend it includes:
- A link to your store
- Key dates for the sale, such as when it begins, and your order cut off dates for local and international shipping.
- Mailing list in-page sign up or pop up
- Images of your work and/or studio progress shots
- Any FAQ’s and their answers; this could be questions that have come up in previous sales, or from friends or family you might have asked to preview your store before opening it to the public.
Once you start making sales and building a relationship, using tools from your website host like Workflow can help with contact management. This allows you to keep everything in one place for seamless sales and tracking.

Selling Your Work Through Your Format Site
When choosing what to offer for sale, we recommend curating your store items the same way you would curate a portfolio gallery. Having too many similar products listed at one time can make it harder for visitors to choose.
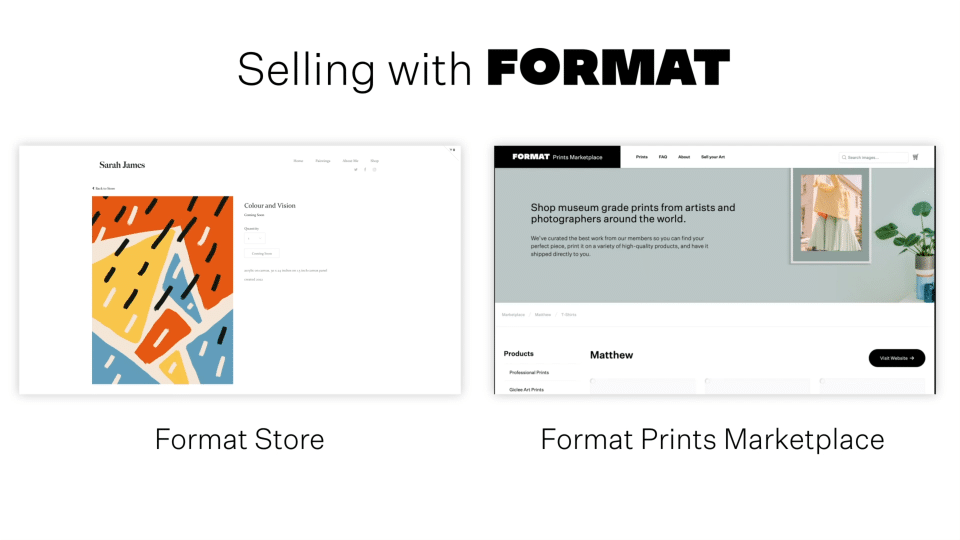
There are a lot of options available for selling your work, from galleries to local art markets and online marketplaces to customizable website. Format members can sell work directly through their website with the Store feature or utilize the Prints Marketplace for auto-fulfillment of photographic and digital art.
Benefits of the FORMAT STORE:
- Sell any physical product, service, or digital download*
- Connected through Paypal for easy, international payment processing
- Self-fulfillment of products means you can use your own production facilities and shipping options
- No commissions taken on sales from Format so you keep all the profits from sales.
Benefits of the PRINTS MARKETPLACE:
- For photos and digital images only*
- Connected through Stripe for easy payment processing
- Auto Fulfillment through our print partners means that we handle the printing and shipping on your behalf.
- No upfront cost of production for you–fulfillment is on demand.
- Small commission taken from sales (15% pro, 5% pro plus)
- See production costs upfront to help with pricing your products.
Ready to get selling? You can try Format for free, and learn more in our webinar on Selling Your Work Online.


