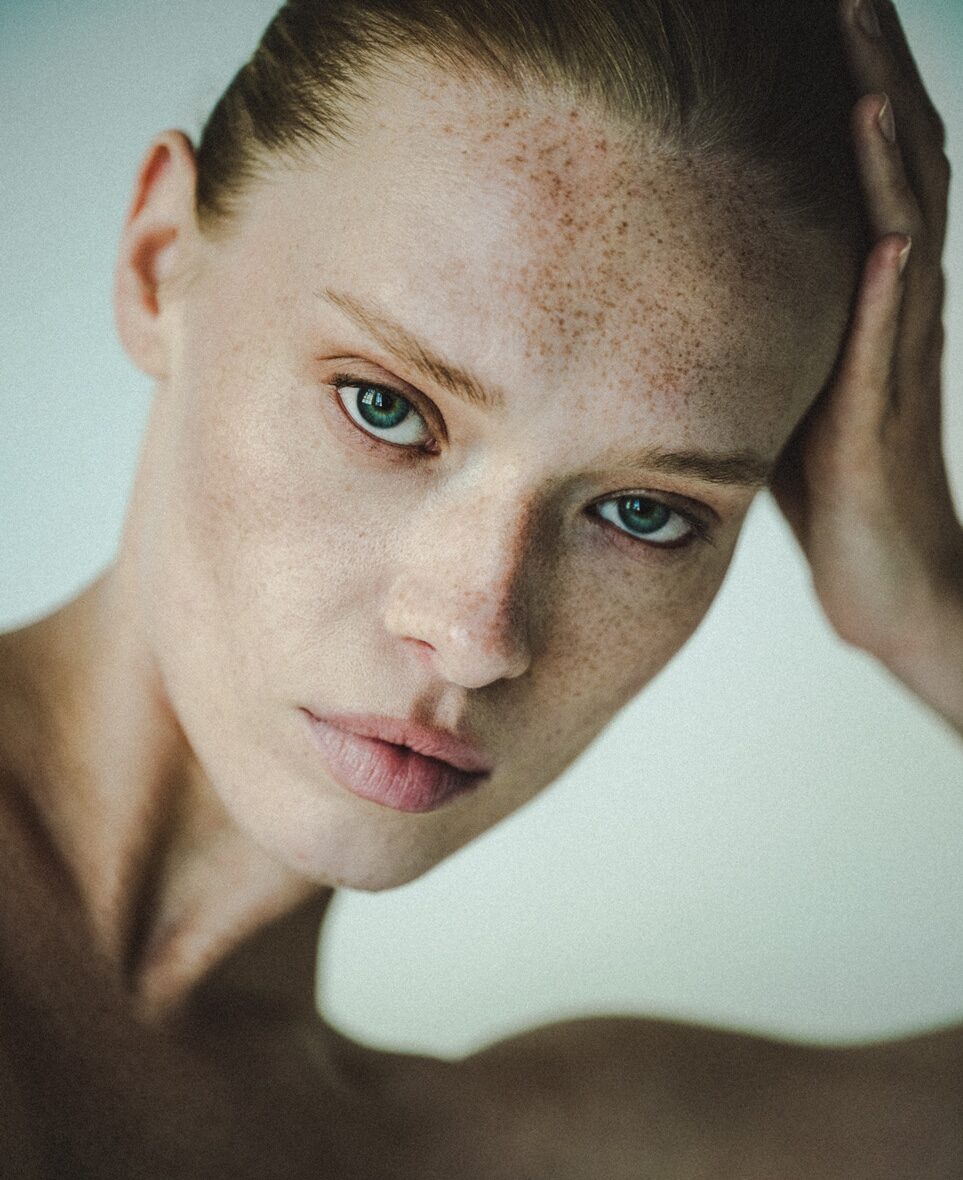
If there’s one thing humans love, it’s pictures of themselves. Just visit any museum to see how much! There are always clients in the market for a portrait, whether it’s of themselves, a loved one, or their corporate client. The fact that portrait sketches are so in demand makes them an excellent addition to your online illustration portfolio, and, potentially, a great side hustle that capitalizes on your illustration skills.
There’s something so satisfying about capturing the perfect likeness of someone, too. Portrait drawing is a delicate art—but we have faith that you can master it! Here’s our top 14 tips for how to draw a great portrait.
How to Draw a Face
Purchase Your Portrait Drawing Tool
We recommend using a B pencil—or any light pencil you might have—for your drawings of people. If you’re unfamiliar with which professional drawing pencil is best for you, you can brush up here. For this tutorial, we recommend having a B pencil, 3B pecil, 4B pencil, 5B pencil, and 6B pencil on hand.

Start With Shapes
Drawings of people are all based on geometric shapes. Subjects’ faces and bodies can be broken up into circles, triangles, and squares.
Need some practice in learning how to draw a face? Print out a picture of a person you want to do a portrait sketch of. Start by breaking the face and body down into the basic shapes you see. Draw these shapes on the image itself.
Regardless of whether the image is straight-on, in silhouette, or offering three-quarters view, break it down. The forehead, for an example, is an oval. The cheeks are circles, while the hair is a bunch of circles. The nose is a triangle, perhaps. Feel free to repeat this process with as many photos as you need to get this skill down!
Work Those Relational Lines
A big part of how to draw a face comes down to getting the perspective right. You need to understand the relationship between all the features of the subject’s face, and place them the correct space apart. Use gentle lines to mark these relationships.
Where is the end of this nostril in relation to the corner of the mouth? Where are the ears in relation to the eyes? Draw vertical or diagonal lines to note the alignments and stackings of the features.
Nail Those Distances
Now we’re going to transfer your shapes and lines to your actual sketching surface. Ask yourself if you’re doubling the original image’s size. Tripling it? Copy the shapes that you sketched on your reference image, followed by the relational lines. Keep it all proportional—this is key.
The final step in learning how to draw a face is the measurements. Here’s a portrait drawing tip: you can use your pencil as a measuring tool here. Look at your original reference image: how much of your pencil aligns with the distance between the mouth and ear? One-third of the pencil? If you’re making the portrait twice the size of the photo, the distance between the mouth and the ear should be 2/3rds the length of the pencil. Do the measurements add up? Is it still proportional?
Don’t be afraid to add more lines to either the original image or your surface. It’s good to create distinct landmarks to help you determine exactly where each feature is going.
Now that we’ve learned how to draw a face, let’s get started on those features!

How to Draw A Realistic Mouth
Now that you have a basic idea of where the major landmarks are going to be, it’s time to start sketching out those facial details. One portrait drawing tip? We suggest starting with the mouth. Depending on whether your image is a three-quarters view or a silhouette, the mouth could be on the perimeter of your portrait, and establishing the perimeter is important. Also, the mouth is the most delicate of all the facial features, so it is easily adjustable, and also a great springboard to drawing the rest of the face.
Still working with your B pencil, start with small shapes within the lips themselves, with two small circles at the plumpest part of the upper lip, and one for the bottom. From there, start on the shadows of the mouth: where the lips touch each other, draw what shadows you see.
Switch to a 3B or 4B pencil to start adding the mid-tones to the mouth. Mid-tones comprise most of the face, which a lot of artists forget when doing drawings of people.
With the lighter mid-tone pencil, add the short, curved creases of the lips. This is a crucial part of learning how to draw a realistic mouth. Be mindful: how you draw these lines will indicate the volume, age, and suppleness of the lips. Cite your original reference image if you’re uncertain. Are the lines very fine, or are they a bit coarser? The lips really do say quite a bit about the subject.
From here, with the side of your B pencil, add the subtle shadows around the mouth. The shadow below the lower lip is an indicator of its size. The shadows at either side can indicate the subject’s mood. The Cupid’s bow shadow above the upper lip will help transition you into the nose.
When you’re confident enough with your portrait drawing, you can use your finger or a tissue to blend these shadows to really add dimension. Later on, you can also consider using different mediums for you for your portraiture, too.

How to Draw A Realistic Nose
Following the cue from the Cupid’s bow, you’ll know where the base of the nose will be. With your B pencil, start with two or three circles (depending on which perspective your portrait is at): one for the ball or tip of the nose, and the other(s) for the nostril(s). From here, add very delicate lines for the perimeters of the visible nose.
With your 3B or 4B pencil—depending on the darkness—begin adding the shadow. You’re not outlining the nose; you’re giving it dimension by creating the illusion of shape through the shadows on the nose.
Citing your original shapes, relational lines, and measurement lines, keep to your proportions and distances when adding the shadows. Does the person have large nostrils or very petite nostrils? Do they have a bulbous tip or a slight tip?
One portrait drawing tip: don’t shade the bridge or sides of the bridge of the nose too much because whatever amount of shade you add there will have to continue onto the cheeks of the face. Remember: if you’re just figuring out how to draw a realistic nose, less is more.

How to Draw Eyes
The eyes are the windows to the soul! Learning how to draw a realistic eye is one of the more complex parts of creating drawings of people. The bridge of the nose leads into the bottom of the eyebrows, so make note of that when starting with your B pencil. Again, depending on which perspective your subject is in—straight-on, three-quarters, or silhouette—start with light shapes: a circle or oval for the iris, a long crescent for the upper eyelid, and an oblong rectangle for the eyebrow. A real portrait drawing rule of thumb is that when you’re drawing the iris, it is never fully revealed: the upper eyelid is almost always covering at least the top third of it.
Now, with your 3B or 4B pencil, begin adding the shadow to the eyelid crease, under the eyebrow, and very subtly on the eyeball under the eyelash line. The graduated shading on the eyelid should probably be done with a tissue on the end of your finger.
From here you can begin to add the dark pupil and the iris spokes. The pupil is quite dark, so you can go in with a 4B pencil for this one. The iris contains some dark and light highlights, so this part will take precision and delicateness. When completed, consider smudging the iris gently with a tissue to help eliminate the appearance of obvious lines.
When adding highlight or reflection to a portrait sketch, like to the eyeball, remember that you’re not drawing in the highlight: you’re removing shadow to allude at the presence of light. One tactic would be to take a small eraser and erase spots where you have already sketched, which will create a reflection effect.
For the hairs of both the eyebrows and eyelashes, start with a B pencil, then go over it later to darken as necessary. Don’t forget: eyebrow hairs are typically quite short and straight, whereas eyelash hairs are long and usually curved.

How to Draw Realistic Hair
When learning how to draw realistic portraits, the hair can really be the linchpin. There are four steps you need to work on here: volume, flow, value, then texture.
Volume
First imagine that your subject is wearing a helmet. With your B pencil, lightly draw the perimeter of the hair as one solid shape, similar to a helmet. Remember that the hair is not two-dimensional, and adds additional width and height to the head.
Flow
Imagine water running down a rockface. Longer hair flows downward and rolls over the shoulders and around the curvature of the face. With your B pencil, establish these different groups of hairs traveling on their own paths downwards. For shorter hair that may not have the weight to flow downwards yet, lightly outline the peaks and valleys that you see.
Value
This is when you use your variety of pencils to establish shadows, mid-tones, and highlights. Start lighter, shading the shadow and lighter hair parts, and remember to omit any shading for the highlighted sections. From there, go to work on the darker sections.
Texture
Texture is the tedious part. You can add as much or as little texture as you choose, but since you’re learning how to draw realistic hair, we’ll take you through it!
With the finer points of your pencils, you can lightly add in the lines of the individual hairs within each flowing section that you established earlier. Don’t draw the hair from scalp all the way down; instead, thinly streak the hairs where you want them emphasized.
Complete Those Finishing Touches
Once you have completed all the features, you can go over spots you want to darken with a 5B or 6B pencil. It’s always best to save that to the end because it’s always easier to darken than it is to lighten.
And that’s it!
Add Your Portrait Sketches to Your Online Portfolio
Once you’ve got a few of these portraits under your belt, you’ll want to showcase them in your online portfolio website. Don’t have one? Find a website builder that has some cool templates that will show off your work nicely. Cruising through the portfolios of other illustrators and artists is a great way to get some inspiration for putting together your own site.
Now put these portrait drawing tips to work and start doing some drawings of people—we can’t wait to see ‘em!
Want more illustrator advice?
So You Want To Be A Freelance Illustrator?
The Best Illustration Competitions and Awards for 2018/2019
The Best Online Illustration Classes for Artists