When it comes to choosing a photo editing software, it can be quite difficult especially when there are a number of different choices. Adobe alone has a number of photo editing software to choose from, like Lightroom, CC, and Photoshop. To enhance your online portfolio website, it’s important to choose the right software to suit your budget and needs. In this article, we’re going to take a closer look at Luminar and see how it compares to Lightroom.
What is Luminar?
Luminar is an affordable photo editing software made by Skylum, compatible with macOS and PC. Luminar 4 was released in 2019, an update to Luminar 2018, or Luminar 3. This photo editing tool has become popular among photographers for its clever artificial intelligence programming and reasonable price. Skylum updates this tool often, adding new features to each new generation of Luminar.
What is Lightroom?
Adobe Lightroom, or Lightroom Classic, is considered the gold standard for photo editing software, especially among photographers. It is often the photo editor of choice for professional shooters, and is compatible across many different systems, from Android to macOS. Adobe Lightroom is part of the Adobe Creative Cloud, which includes other Adobe tools like Photoshop, Indesign, and Illustrator.

Image from Luminar.
How Does Luminar Compare to Lightroom?
Finding the right photo editing software can be a challenge, especially when you’ve got two possible options to choose from. When it comes to finding the editing tools for you, you might be tempted to go with Lightroom, a classic photo editor with a solid track record. However, Skylum Luminar 4 is becoming an enticing choice for photographers due to its affordable price and impressive editing capabilities.
Let’s break down the Luminar vs Lightroom debate, comparing the features, interface, price, and ease of use for both editing tools to help you figure out the right one for you.
Features: Luminar vs Lightroom
Let’s take a closer look at the Luminar vs Lightroom comparison when it comes to photo editing features, including:
Presets
With its massive library of professional presets, Adobe Lightroom is known as the standard for photo editing for a reason. In Lightroom, you get access to presets you can apply to your images with a few clicks that you won’t be able to access with Skylum Luminar. Looking to add pop to street photography, brighten up macrophotography, or give your photos a more film-like look? In Lightroom, there are presets that can help you do this in one click.
Though Luminar does offer presets, they are not as extensive as the ones offered through Lightroom, as the software is relatively new. However, there may be more presets available in Luminar in future updates.
Spot Healing Tool
Lightroom CC also has a spot healing tool that can’t be beat, as Luminar does not offer this tool. With its superior performance and precision, the spot healing tools makes it easy for you to sample part of the image to improve its overall appearance, a common issue in landscape photography and portrait photography.
The sharpening, vignette, and lens corrections in Lightroom also perform better than Luminar’s current capabilities, so if you find yourself using these tools often, Lightroom may be your best bet. Overall, the precision of Lightroom’s tools is beyond what you can access in Luminar.
AI Filters
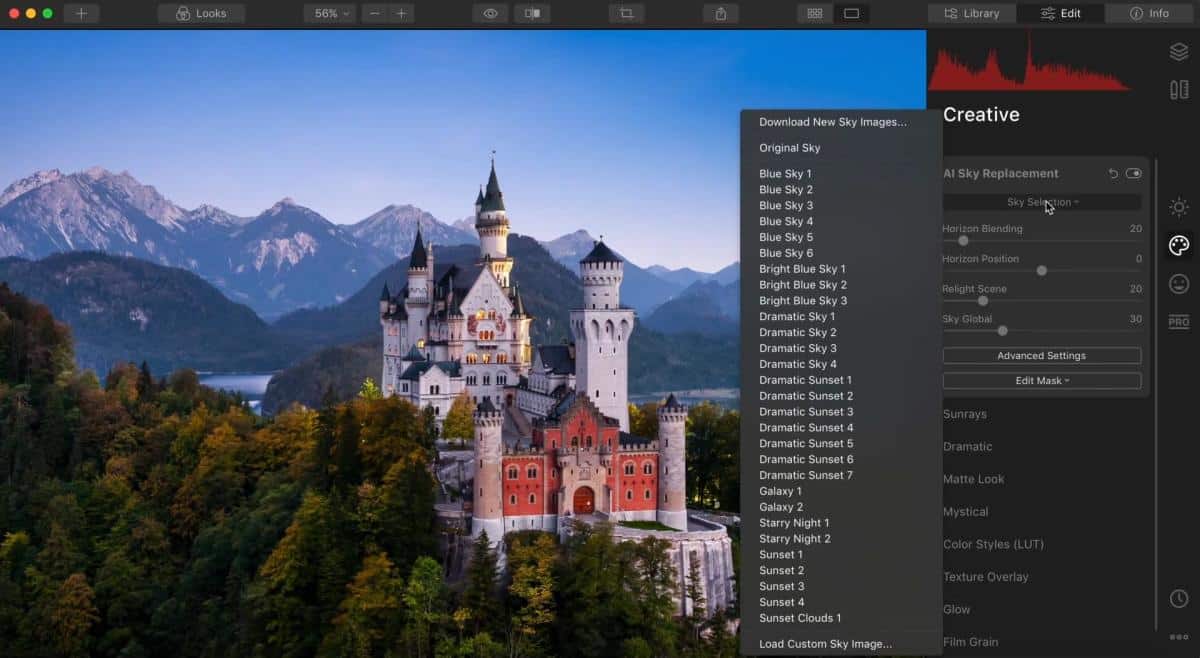
The major selling point for Luminar 3 and 4 are their artificial intelligence filters, where AI does most of the filtering and processing of your images to make photo editing a breeze. For example, Luminar has an AI Sky Replacement, which makes it easy for you to replace entire skies in a landscape or a portrait image in one click.
Luminar also offers other impressive editing tools like AI Portrait Enhancer, AI Skin Enhancer, and AI Structure that take only a few seconds to apply to your images. With the power of AI, these one-click features are precise and impressive. They also make basic and more advanced photo editing accessible for beginners.
Layers Feature
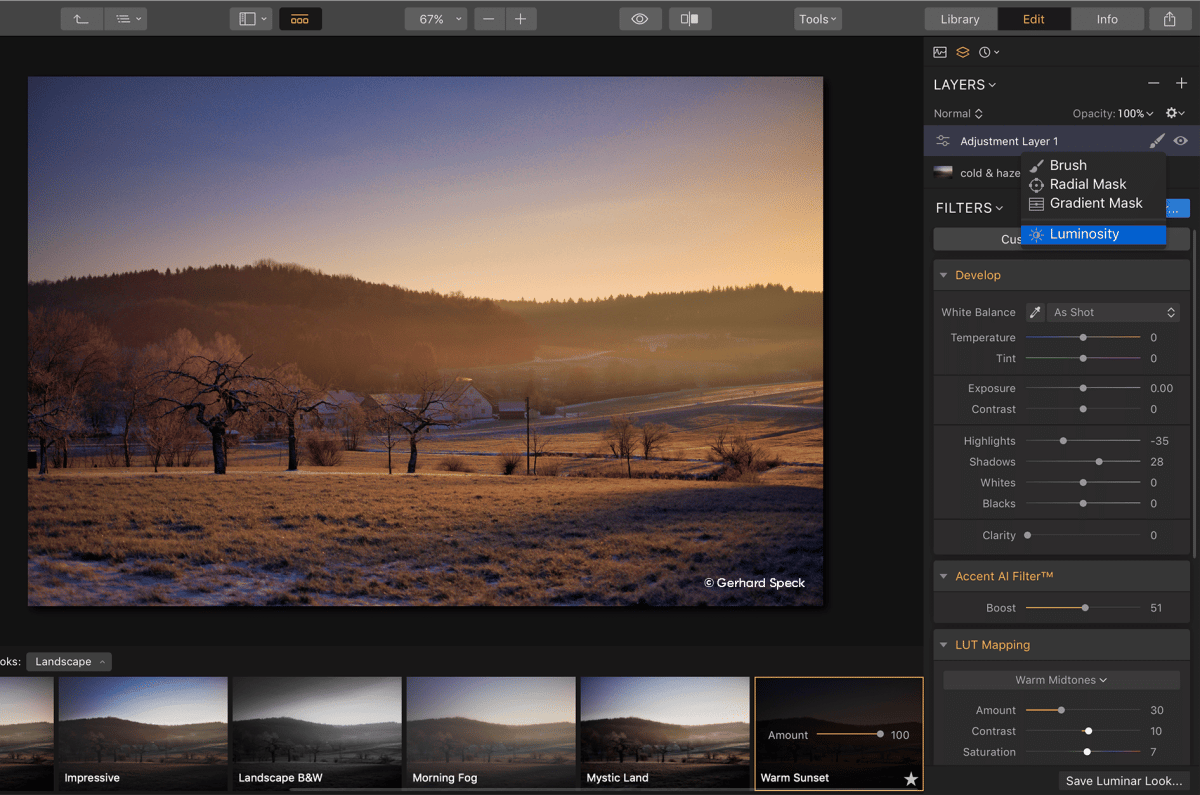
Luminar also has a layers feature that Lightroom does not have, which makes it easy for you to stack your adjustments on an image. This makes advanced photo editing easy to control and adjust, manipulating each layer until you create your desired look, similar to the layers feature in Adobe Photoshop. However, some photo editors prefer not to use a layers approach to editing and do not need this feature as part of their workflow.
Photo Retouching
In terms of photo retouching, Luminar offers Dodge and Burn tools so you can do more advanced and precise retouching on a digital asset. You can also do batch editing in Luminar using presets to adjust the white balance, brightness, contrast, and shadow, which makes editing a lot of images exactly the same way a breeze. In comparison, Lightroom is primarily focused on color correction only when it comes to retouching, so though you can make basic adjustments, more detailed photo edits can be a challenge in Lightroom.

Luminar vs Lightroom: User Interface
Luminar’s user interface has been designed with simplicity and accessibility in mind. At first glance, you can tell it’s been created with beginners in mind, from the toolbar at the top with basic options, and tool panels on the right that are clear and uncluttered. Luminar also offers a customizable editing toolbar, where you can custom their existing editing collection to suit your needs, including brush, radial, and gradient masks. Some photo editors love the customizable aspect of Luminar, particularly if they have a specific approach in mind for their images.
In comparison, Lightroom’s user interface is accessible but less sleek and tailored for professionals who are familiar with photo editing software. Most professionals won’t need a customizable editing toolbar, as they will find the tools offered in Lightroom more than sufficient. However, beginners might find it frustrating that they cannot move any tabs or delete any tools they don’t need in Lightroom.
Pricing Structure for Luminar and Lightroom
In the Luminar vs Lightroom debate, one of the major sticking points is cost. Adobe Lightroom Classic is part of the Adobe Creative Suite, so to access it you will need to pay for a monthly subscription. The cheapest monthly subscription for Lightroom only is $9.99 USD a month. If you want access to other Adobe products like Photoshop and InDesign, the monthly subscription is higher.
If you use the Adobe Creative Suite already, shelling out for the subscription to access Lightroom as well may not be much of an issue. If you ever decide to pause your subscription, you will still have access to images in Lightroom but you cannot edit them or process them in any way.
Comparably, to purchase Luminar 4, it’s a one time cost of $80 USD, and there are often discount codes for the software floating around online. However, when Luminar is updated or a new generation is released with new features, you will need to purchase the software again to access them, a cost that can start to add up over time.
You might be motivated to purchase Luminar 3 or 4 due to cheaper price point, particularly if you are on a budget and don’t want to spring for a subscription you have to pay every month. However, some photographers might see the value of paying a monthly subscription to access Lightroom CC and the Adobe Creative Suite. And remember, as a freelance shooter, you can always write off this expense as part of your business.
Luminar vs Lightroom: Ease of Use
One of the most important aspects of choosing software is how easy it is to use in terms of organizing, labeling, and tracking your images in the program. When it comes to workflow, Lightroom uses the catalog system to organize images. Working Lightroom is also easier with their keyboard shortcuts. In Lightroom, you can sort images, star or flag them, and apply color-coded labels using image metadata. You can also add bulk keywords and filter them easily so all of your images stay organized.
In comparison, Luminar 4 organizes files in the Luminar library, a version of Lightroom’s catalog system. This feature allows you to apply star ratings, color labels, and pick or reject images. But compared to Lightroom, the Luminar library is pretty basic. You cannot manipulate the photo’s metadata to include keywords or filtering with ease. Some photographers will spend extra time curating their images using the collections feature in Luminar to get around this limitation, but if you are working with a massive number of images or want a quick, efficient way to filter images, Lightroom may be a better fit.
As well, if you are planning to get into stock photography or need to add copyright to your images, having the ability to tag and filter images using their metadata is an important feature. Some photographers also prefer the ease of searching for images via text quickly and efficiently. It’s possible that Luminar 4 may be upgraded to include these features later, but for now, Lightroom Classic wins over Luminar when it comes to metadata tracking and organization.

Image from Luminar.
Asset Management in Luminar and Lightroom
One of the biggest distinctions between Lightroom and Luminar is the way a digital asset, such as an image, is managed. In Luminar, when you edit an image, you are working with the actual file and there is no option to create a virtual copy of the image. In Lightroom, you are able to create a virtual copy so if you make a mistake, you don’t risk losing the original file.
In this way, Lightroom is non-destructive and will ensure you do not lose your original file. You may value a non-destructive system like Lightroom if you like to play around a lot with an image and don’t want to have to worry about losing the original file. It’s also a way to protect your images as part of your workflow, an important feature if you plan to edit a lot of images regularly.
Exporting Files
Another aspect to note in the Luminar vs Lightroom comparison is the way exporting files work in the two programs. In Luminar, the export window is fairly basic with limited options and no presets. If you work with JPEGS or TIFFS, this may not be much of an issue for you. But if you work with clients who need more options for image delivery, you are limited in Luminar.
Comparably, Lightroom offers a wide selection of different options for exporting a digital asset, from converting to DNG to applying presets and to creating a watermark on the image. You can also install plugins to further modify your export options and save export presets so you have them for future projects.
Printing Files
When it comes to printing digital assets, Lightroom has way more options than Luminar to help ensure your images are of high quality and professional. The variety of options for exporting an image in Lightroom translates to the variety of options available to you when you’re ready to print. In fact, there is a separate “Print” window in Lightroom so you can prepare and create files for printing. If you print your images to sell at a professional level, you will need to have access to the print settings in Lightroom.
Which Photo Editor Software Should I Use?
After comparing and contrasting, you may still not be sure whether Luminar or Lightroom is right for you. These two programs are hotly debated for a reason; both offer a variety of great features for photographers. Ultimately, you have to consider which options make the most sense for your skill level, your workflow, and your clientele.
If you’re a beginner photographer who is still learning how to edit images, and you’re on a budget, you may decide Luminar is the best fit for your needs. It’s a simple, easy to use program that turns out great results. It is also still being improved and further developed by Skylum, making it a great beginner software for editors.
A more experienced photographer may opt for Lightroom to refine their skills and take their images to the next level, particularly if they are already familiar with photo processing. You may also decide to invest in Lightroom over Luminar if you are juggling a lot of clients with different exporting needs, and aren’t daunted by some of the more technical aspects of the software.
A third option is to combine the two programs and get the best of both worlds. You can use Lightroom as your main software to edit and manage images, and then access Luminar to implement cool features like AI tools or a customized toolbar. Once you’ve used Luminar for additional edits, save the file in Lightroom to add it to the collection, export it, or print it. This way, you have a powerful workflow that plays to the strengths of the two softwares, without any of their limitations.
Showcase Your Photos in an Online Portfolio
Once you’ve decided if Luminar or Lightroom (or both!) are a good fit for your needs, have some fun with the software and play around with your images to really make them pop. After they’ve been edited, don’t let them just sit idle on a hard drive or on your desktop. Show them off in an [online portfolio](/online-portfolio) so you can wow your clients and your peers with your photography.
Don’t have an online portfolio yet? Use a website builder to build one in 10 easy steps and highlight your edited images.
Pick one that has gorgeous themes to choose from, and offers features like a built-in blog and online store, plus client proofing.
This way, you can attract potential clients by showcasing your photography and increase your chances of getting hired for photo shoots or photo editor jobs in the future.
Looking for other photography resources?
How to Make a Watermark For Your Client Photos


