GIFs are a hot commodity these days, popping up absolutely everywhere online. Haven’t mastered the fine art of GIFs yet? This is a must-have skill in today’s competitive job market, and something much coveted by potential employers and freelance design clients alike, making it a great addition to your online design portfolio.
If you’re looking to learn how to make a GIF in Photoshop, we’re here to help! This guide will get you producing dank memes, animated banners, and promotional materials in no time at all!
Step 1: Load Images Into Photoshop
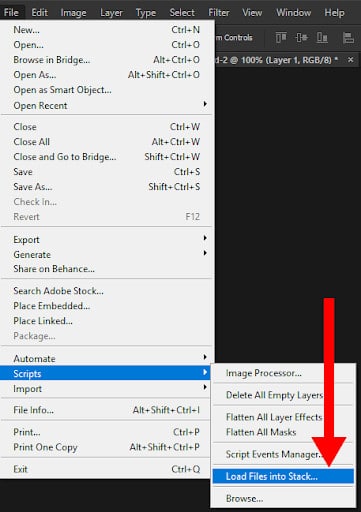
Before you can make an animated GIF in Photoshop, you’ll need to get your images imported and ready to animate. There are different approaches here, and it will largely depend on how you wish to proceed:
Have a Series of Images Ready to Go?
So you’ve got a series of images that already have a flow that you can animate, or your client has provided you with the images you’ll need? Awesome. You can get started easily by going to File > Scripts > Load Files Into Stack. This helpful option allows you to load an entire range of images simultaneously, rather than needing to drag each one into your document individually.
You’ll be prompted to open files, so select the Browse option and locate each file you intend to place within the document. Once you press OK, Photoshop will automatically create a layer for each image you opted to include.
Have a Single Image? (Or No Image at All?)
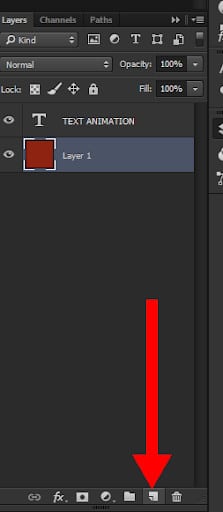
If you have no image at all or a single image you intend to work from (as is often the case with animated banners), create a new document with File > New. Then, simply drag your image into the Photoshop project window or go to File > Open and select your image.
If you intend to create additional frames with other images within this new document, you’ll need to create layers for each of these manually. To accomplish this, select either Layer > New > Layer or click the Layer button on the layer palette.
You’re on your way to creating a GIF in Photoshop! Once this step is completed by either method above, be sure to name each layer to help keep your workflow organized. Double-click the layers name in the layers palette and rename each one. Make this a habit: it will make editing your files much easier when it comes time to save your GIF in Photoshop if you can figure out what every element is at a glance.
Step 2: Open the Timeline Window
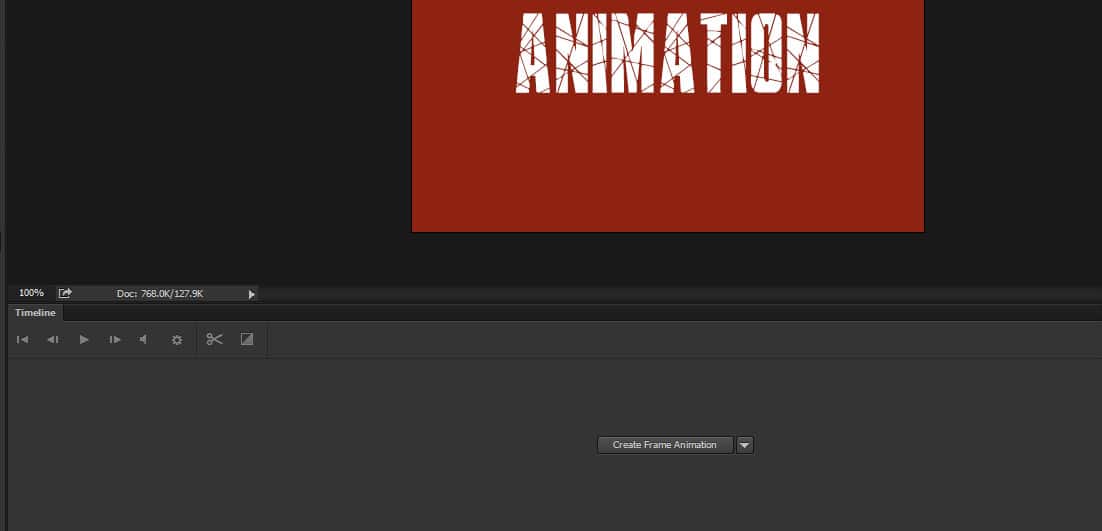
Before you can begin to animate anything, you’re going to need the ability to create keyframes. To do this, you’ll have to open the Timeline window. This is not open by default when creating an animated GIF in Photoshop, so navigate over to Window > Timeline and select the option to get started.
Once you’ve selected this selected the Timeline option, the window will appear at the bottom of your screen.
Don’t be afraid to reach out to clients to find out what they want before diving much deeper into the process. You want them to be happy, so you’ll need to stay in touch!
Step 3: Create Frame Animation
This step couldn’t be simpler. Click the Create Frame Animation button within the timeline. Changing to this layout will adjust the Timeline mode to a frame-by-frame style. Notice how your image is now laid out as a frame in this timeline? These frames are where you can apply your animation edits.
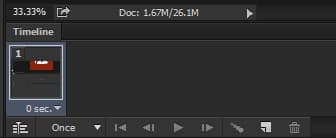
What’s a Frame Animation (Keyframe)?
What exactly are frames in this context? Through Timeline Frames (keyframes) we can apply frame-by-frame edits to our images and create animated effects such as tweening and blinking text via layers. The Timeline window allows you to adjust layers on and off, move elements in individual frames, rotate text, apply filters, and adjust the length of time certain frames persist for.
Step 4: Give Each Frame a Layer
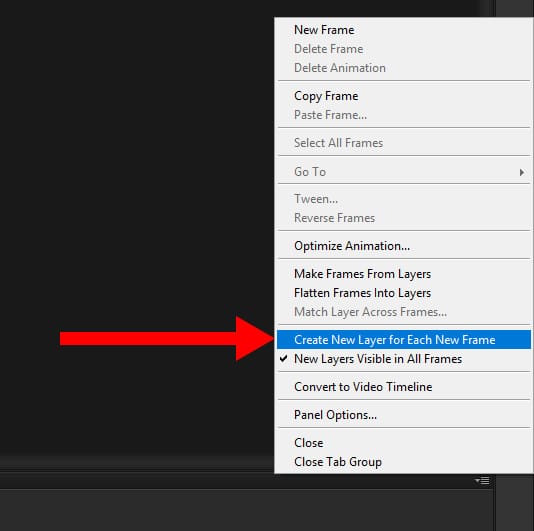
When you are creating an animated GIF in Photoshop, you’ll need to be sure that each individual frame has its own layer. This gives you the power to edit each frame however you like without impacting the others in your project—this is an essential part of designing a clean animation. To split your images into layers, choose Select > All Layers and then locate the Timeline menu icon here at the top right of the window:
From there, select Create New Layer For Each Frame:
You’ll now have separate layers for every single frame that currently exists in your document. (Want to learn some extra bells and whistles for your Photoshop work? Check out our mega-list of Photoshop tutorials!)
Step 5: Make Frames from Layers
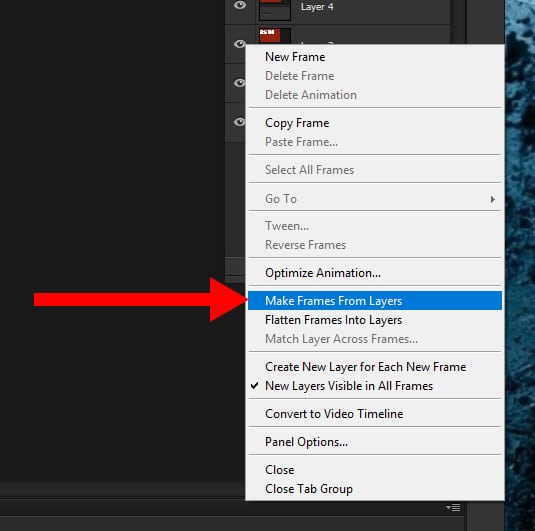
Next, in that same menu, go ahead and select Make Frames From Layers as well. This will make each separate layer into a frame in your Timeline.
After this, you’ll be able to select each individual frame in your Timeline and edit elements as you see fit. This is where the bulk of your work will be done. The more complex your animation, the more frames you are going to require to accomplish great transitions. Be sure to pick web-friendly fonts if using text in your creations!
Step 6: Frame Durations
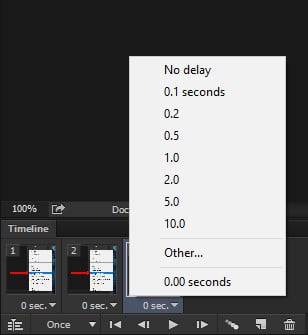
You’ve almost learned all you need to create a GIF in Photoshop. Just a few more bits to go! Now that you have the basic frames all setup, our next step is to determine how long each frame plays for. If you don’t do this, your animation will behave oddly—or perhaps not play at all.
This is a very simple process: select the frame you wish to edit, and then click the arrow and select the time from the dropdown that appears. By default, Photoshop has each frame set to 0 seconds, so you’ll want to change that, or your animation will not properly function. Try selecting 0.2 or 0.5 seconds to start. You can always edit this later.
Step 7: Looping Options
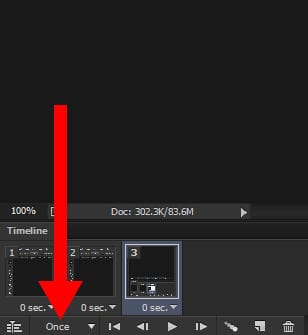
Now that you have created the GIF in Photoshop, it’s time to make sure that it’s working well. Do you need your image to repeat more than once? Then you’re going to need to set up looping options. Below the timeline, you’ll see several options. Select the Once option and open the dropdown.
You’ll be able to choose from a few pre-made options, as well as customize your own specifications. Select whichever suits your needs. The most commonly selected option is “Forever” since the majority of animated GIFs are intended to play over and over so long as they remain open.
Step 8: Preview
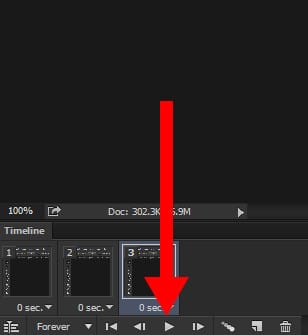
For the next step of creating an animated GIF in Photoshop, you’ll need to preview your GIF to make sure it animates the way you like and that there are no surprises. Photoshop allows you to view it in the program without needing to save it into the file format first. To preview your animated GIF, simply press the Play button on the Timeline.
Step 9: Save Your GIF in Photoshop, Then Export
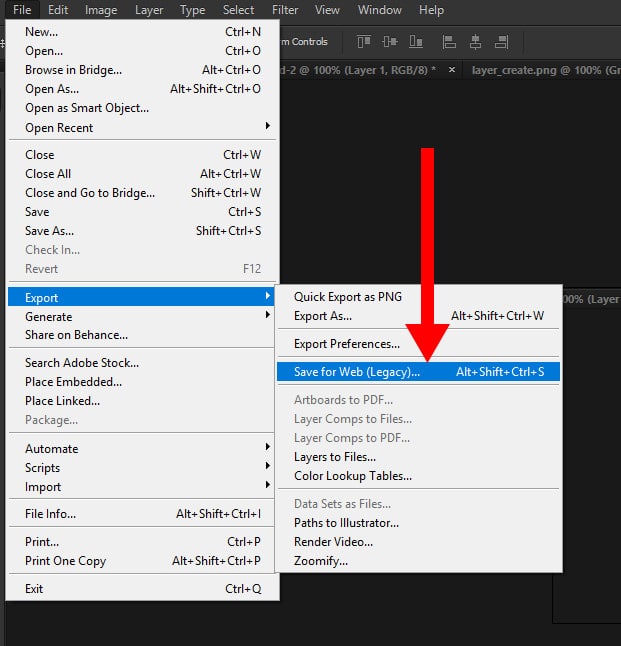
Now it’s time to save your GIF in Photoshop. Note that you need to save it a bit differently than you are used to via the ordinary Save command. You’ll need to navigate to File > Export > Save for Web (Legacy) instead. Follow the prompts, name your file, and you’re golden! Saving a GIF in Photoshop is just that easy. Once you are done exporting, be sure to view it outside of Photoshop as well (and perhaps get feedback from other creatives), as sometimes you miss tiny inconsistencies that need to be addressed. Be sure to also save the document itself, as you’ll want the PSD file later, should you need to edit things.
Working with Video
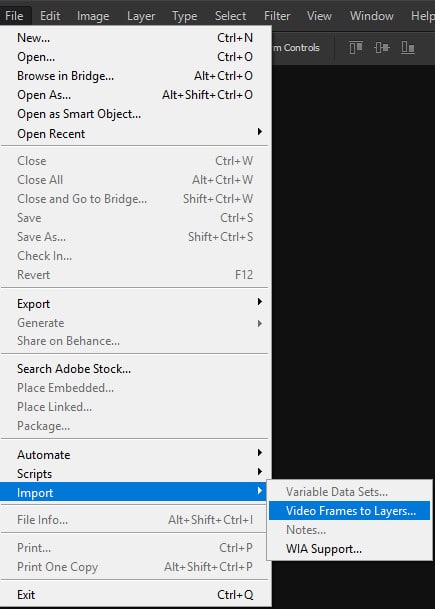
You can also use Photoshop to create animated GIF files from video clips. To do this, navigate to File > Import >Video Frames To Layers.
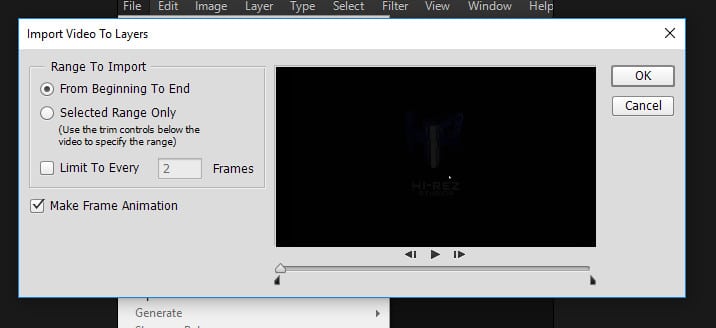
This will load up a dialog box that asks for the desired video file. Select your video, and you’ll be given a myriad of other options.
The key here is to limit the total number of frames, especially if the video is longer than a couple of seconds. Otherwise, you’ll end up with thousands of frames, and that will make things effectively impossible to fine-tune.
To limit the frames, you have several options available. You can use the existing dialog to clip a specific section of the video (via the Selected Range Only radio button), or select the Limit To Ever Frames option, and select the total number of frames to limit. For example, if you clicked the checkbox and entered “4″, the program would import only every four frames of the video into Photoshop. This is important to remember, as most video typically uses between 20 to 30 frames per second. You don’t need every frame for a GIF, so keep it light and editable!
Share Your GIFs with the World
Animated GIFs are a powerful form of media that will likely be around for a long time to come—and clients are wild for them. Once you’ve learned how to make a GIF in Photoshop, be sure to put your best creations on your online design portfolio and show off your craziest animations.
Don’t have an online portfolio website? You can use a website builder to create one in minutes. Make sure to pick an online portfolio that offers designer-friendly features, like cool templates and smart typography, and client proofing galleries, so your customers can review proofs right on your site. Here are some other amazing designer websites and animated GIF-filled portfolios to check out for inspiration.
Now that you know how to make a GIF in Photoshop, it’s time to get animating!
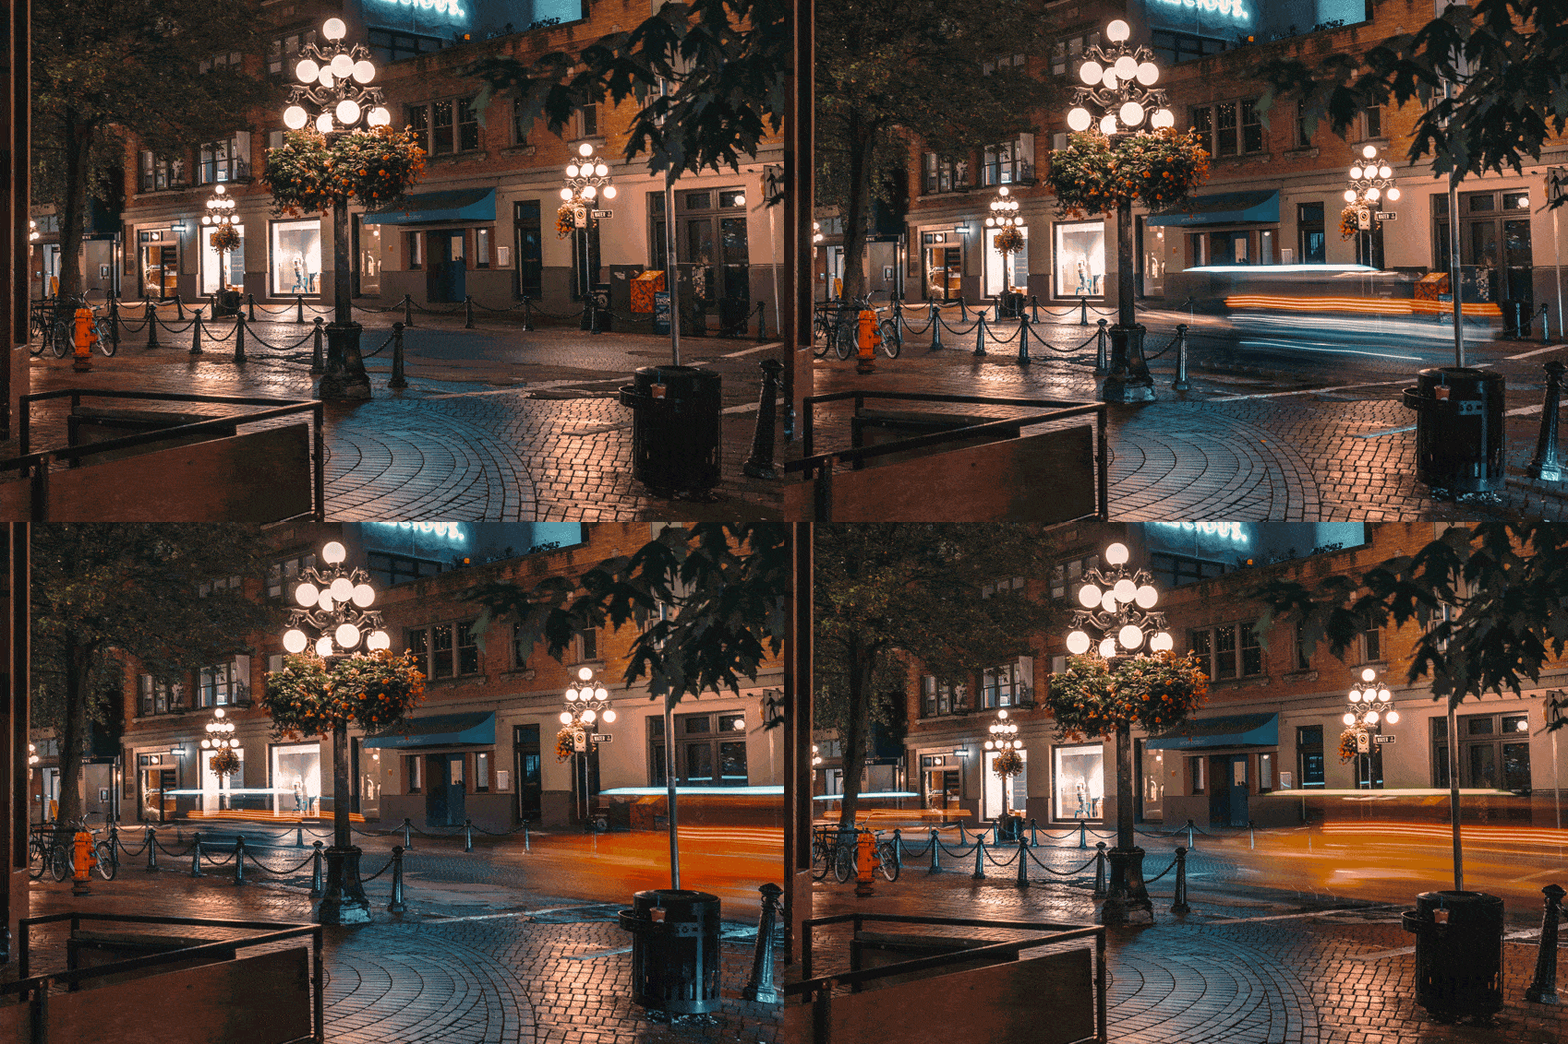
GIF courtesy of @legionxstudios
Want more design intel?
Take Your Video To The Next Level With These 10 Great Gimbals
10 Animation Portfolios that Get Creative with Website Design
How To Make the Perfect Cinemagraph in Photoshop
