A photographer is someone who accepts that continuous learning is part of the creative industry, and the same goes for portrait photography. Some may even go as far as to say that appetite for gaining new skills is essential to your success and your satisfaction with your job as a photographer. While an eagerness to learn is not mandatory, being able to show a broad range of work with a high attention to detail is a key part of an impactful online portfolio website.
What is Portrait Photography?
Portrait photography is all about people. It’s a branch of photography that requires being able to work with a wide range of individuals, to think on your feet, and to make the right technical choices, shoot after shoot. There are many different varieties of portrait photography—family, corporate, street, and creative, to name a few.
When it comes to portrait photography, the list of skills to grow is a long one, and it can span from hard skills like tweaking aperture settings to the elusive art of coaxing your subjects into looking natural on camera. The ones selected below help create a solid foundation for capturing captivating portraits with a variety of portrait photography tips and tricks every photographer should know.
1. Selecting the Right Camera for Portrait Photography
While having a good camera is important, it’s just part of the equation. Today’s technological camera advancements mean that someone armed with a smartphone isn’t at a disadvantage when capturing portraits. However, the right camera can give you greater control over the types of images you capture.
A go-to choice for portrait photographers is a DSLR camera. This type of camera is known for delivering superior quality images while being one of the lightest and best beginner-friendly cameras. Some of the other advantages a DSLR camera offers are autofocus, built-in image sensors and high megapixel count. Other features to look for in a DSLR are continuous shooting, the ability to take multiple images in succession, a battery that lasts at least 400 photos, and an LCD screen for shooting at an angle.
Prices for DSLRs vary by model and brand, and can range between a few hundred dollars to over $1000, with options in the $600 and $700 range.

2. Mastering Camera Settings for the Best Portrait
Switching your camera to manual settings is the only way to exercise complete control over its capabilities. This allows you to control things like ISO, aperture, and shutter speed, which all work together for achieving the perfect portrait photography shot:
ISO – ISO sensitivity refers to the lightness and darkness of a photo. The higher the number, the higher the ISO. Setting your ISO to the lowest possible setting helps reduce noise. Depending on your lighting conditions, set your ISO to between 100 and 400.
Aperture – The aperture is the size of the camera opening, which affects how much light the camera lets in. A large aperture lets in a lot of light, while a smaller aperture lets in less because the opening it can travel through is smaller. For portraits with an out of focus background, you will want to go with a lower aperture between f/1.4 – f/2.8 – f/5.6 This effect is called a “shallow” or “thin” depth of field.
Shutter speed – The shutter speed is the length of time that the lens remains open to let in light. The ideal shutter speed is informed by your light source and factors like ISO and aperture settings. When it comes to selecting the right shutter speed, your best bet is to defer to your in-camera meter and adjust until you get a center reading in the meter. This will ensure a crisp focus in your images.
Getting started with manual settings can seem intimidating at first, but with practice, you will learn to use them with ease to achieve the effect you desire.
3. Lenses to Use for Portrait Photography: Prime and Zoom
When it comes to choosing the best lens for your portrait photography style, your choices fall into two categories: prime lenses and zoom lenses.
Prime lenses offer a fixed focal length. In other words, it’s a lens that doesn’t zoom, making it easier to work – if your subject is within the focal length the lens is built to work with. Prime lenses produce sharper images, which is why professional portrait photographers swear by them. In sum, the benefits and drawbacks that prime lenses offer include:
Pros: sharp focus, easier to work with
Cons: single focus, requires the purchase of multiple lenses
On the other hand, zoom lenses can accommodate multiple focal lengths. This means they allow the photographer to switch between a variety of styles and perspectives without needing to transport and switch to different camera lenses. A zoom lens is a great choice for beginners as they figure out what focal length best suits their style before investing in a prime lens. In sum, the benefits and drawbacks that zoom lenses offer include:
Pros: accommodates multiple focal lengths
Cons: less sharp images, more settings to consider
A pro photographer’s toolkit is likely to store multiple prime lenses that work with the focal length they prefer. Meanwhile, a beginner may have a zoom lens and a prime lens in the focal length of their choice.
Lastly, don’t forget to factor in the sensor size when choosing your camera lens. The body and sensor size will affect the focal length of your lens, and how sharp the images you capture come out. Other choices when weighing your options include an angle lens or a wide camera lens, but these are better suited for intermediate users.

4. Using Lighting in your Portrait Photography
As any photographer knows, lighting and your ability to manipulate it is a big aspect of photography. When it comes to portrait photography, lighting plays a big role in helping tell the subject’s story. For example, hard light is more severe and brings out angles and imperfections for impact, while soft, diffused light, helps contribute to the polished appearance often seen in beauty shoots.
Did you know there are 12 types of lighting that can be applied to the same image with vastly different results? Here is a brief overview of the different lighting types you can use to photograph your subjects:
Natural light
Flat light
Backlight
Soft light
Hard light
Rim light
Loop lighting
Broad lighting
Short lighting
Butterfly lighting
Split lighting
Rembrandt lighting
As you can tell, there are many ways to use lighting in your portrait photography. Finding the right one for you is a combination of using available light and manipulating it to get the result you want for capturing your subject.
5. Deciding Whether to set up your own Home Portrait Studio
Your studio is a controlled environment where you get to call the shots. Just add willing subjects! If you’re just starting out, setting up your own home portrait photography studio is (usually) more affordable than renting a studio.
Aside from saving you money, a home studio means that you will have more opportunities to experiment and hone your skills, making you a better photographer. Last but not least, it means you will know the capabilities of the space better than anyone else and can deliver consistency in your images working with the variables you have.
Keep in mind that headshot images are one kind of portrait photography that benefits the most from home studio capture, followed by pet photography, which can help inspire you to get more photography clients. If these varieties of portrait photography are part of an existing or desired body of work, you may want to consider investing in a home portrait studio to give you superior control over composition and lighting variables.
6. Using Props to Help Tell the Story
Using props as part of portraiture photography can help take your images to the next level, make your composition more realistic, or help bring character into the image. In addition, props are a great way to give more nervous subjects something to do with their hands. For an engagement photoshoot, you may bring a decorative chalkboard into the shot to add more context to the image. To bring a sense of excitement to an image, a colored smoke bomb can visually communicate the gravity of the occasion. Smoke bombs are an especially popular choice for wedding photography.
Backgrounds are a prop that the photographer can use to communicate something about the subject or to help frame it. While the focus should always stay on the subject, using the right background can help the individual stand out for a more memorable shot.
7. Prioritizing the Subject in the Entire Portrait Photography Process
When it comes to portrait photography, the general rule of thumb is, the subject is the main event. As such, the individual or people you are photographing should be the focal point in the composition of your images.
Giving your subject the attention it deserves means so much more than just lighting and composition. It means getting to know your subjects, understanding how they want to be depicted, and making sure they are at ease before, during, and after the shoot.
It’s always a good idea to meet your subject in person ahead of time. Meeting them first helps everyone be more comfortable on the day of the shoot. It gives you a chance to get to know them as a person and their communication style, which contributes to smoother on-set communication and direction between photographer and client.
8. The Importance of Posing your Portrait Subjects
Finding a pose that is the most flattering for your subject is a unique challenge every portrait photographer faces. As the photographer, you are always juggling camera angles, lighting, camera angles, and the photo background for the best outcome.
One portrait photography trick professionals use is to capture photographs with their mobile phones as a visual aid for the subject. You can use the photographs as a visual aid for showing your subject the range of poses you’ve captured or to give them direction for slight adjustments when you feel you are getting close to the perfect shot.
The challenge with posting your subjects is that the end result can end up looking artificial. Establishing rapport with your subject first can help put everyone more on ease the day of the shoot. In addition, if you feel your model clam up, you can try a different pose or a short break away from the camera to help them relax and get into the right headspace. As the photographer, it’s your job to take “temperature checks” of your subject’s mood throughout the process and to do what it takes to help them feel confident in the final outcome.
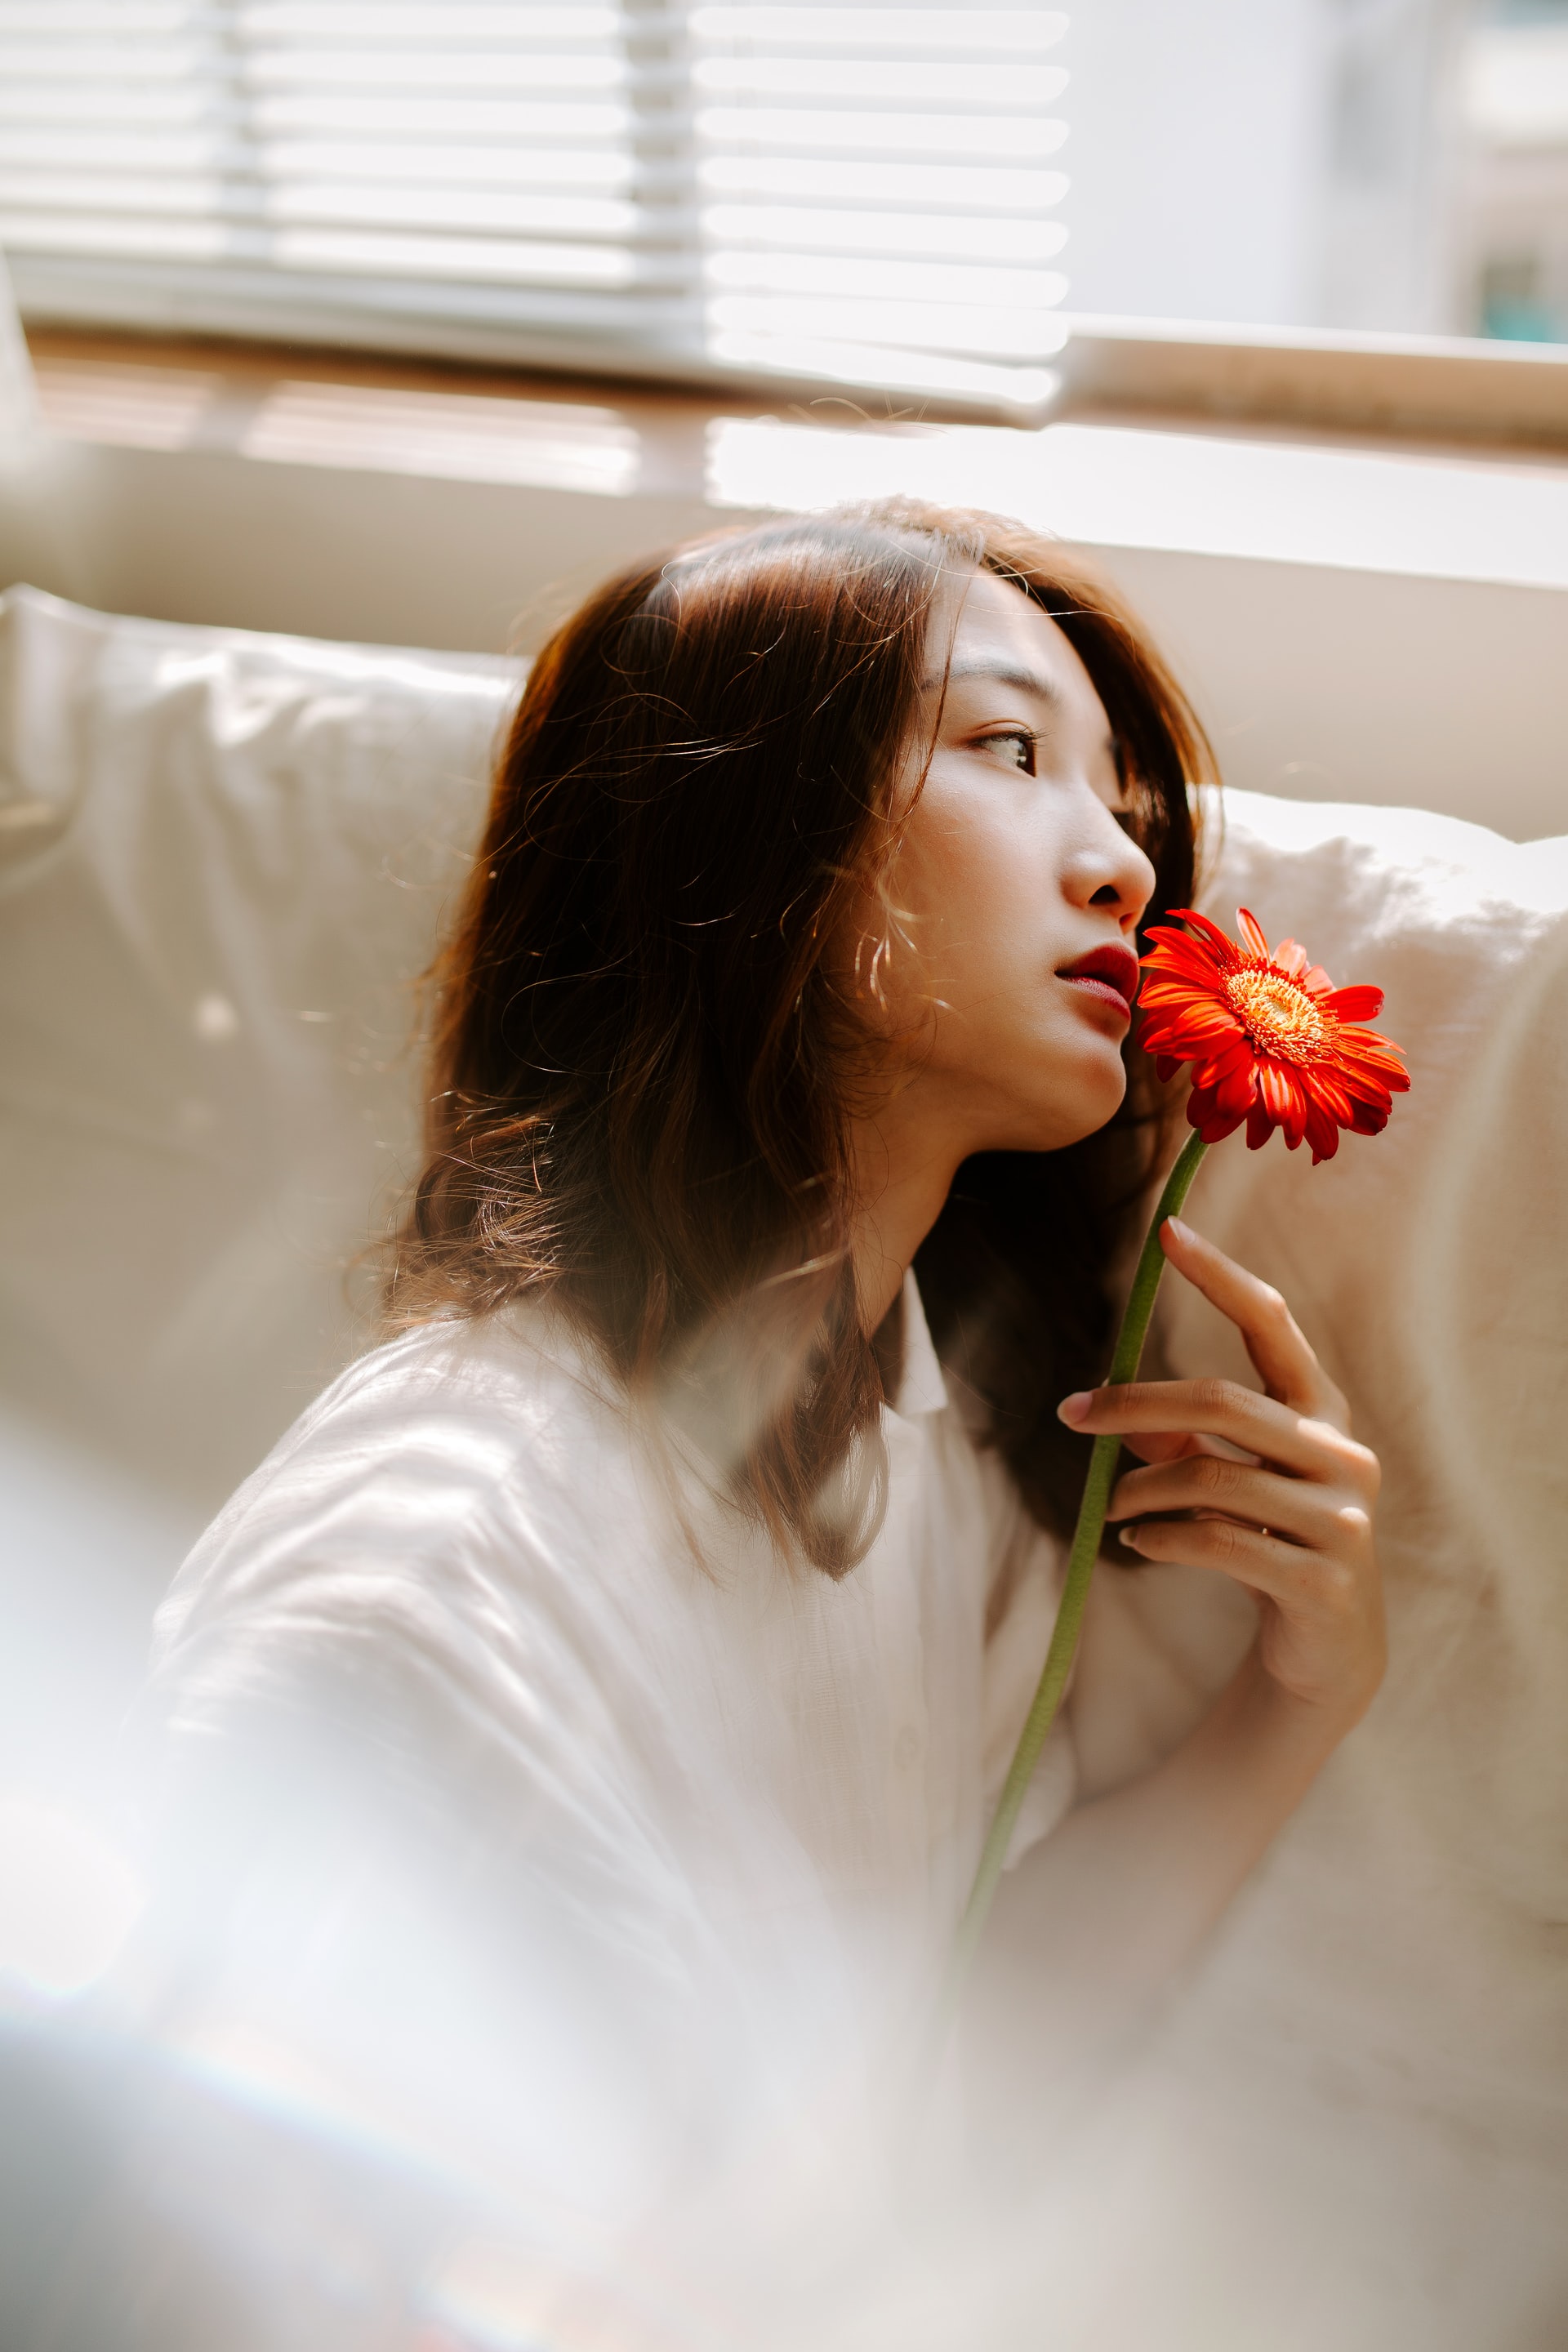
9. Capturing Emotions in Portrait Photography
When it comes to portrait photography, the only thing as important as a flattering pose is an emotive face. Unfortunately, this is easier said than done. A genuine facial expression can make or break an image. This is why it’s essential not to rush your subjects in getting comfortable because it can sabotage the entire shoot. Subjects don’t always have positive experiences – or experiences, period – being photographed, which is why it’s important to create a safe and positive atmosphere on set.
To achieve this, try to give them time to get familiar with the environment and the lighting before you begin. You can also:
Begin the shoot with a conversation
Offer them a coffee or snack
Ask the subject to bring a playlist of music they enjoy
Only once the subject is ready to be themselves on camera can your work begin.

10. The Role Post Editing Plays in Portrait Photography
You may think that once you have captured the photographs, your work is done. In reality, it has just begun. Next, you will want to use editing software to help you crop, resize, and touch up the images before sending them back to the client.
The two most popular pieces of software for professional photographers are Photoshop and Lightroom. While there is heated debate as to which one is superior, both have their strengths and applications. Generally speaking, Lightroom is better suited to beginner users as it offers fewer features and customizations, while Photoshop is considered a more advanced editing platform with complete flexibility and control over capabilities.
One of the best things about using editing software is that it comes with pre-sets that can quickly fine-tune your images based on particular shooting conditions to produce the best results. Then you can export and package the images as desired.
Now that you have a foundation of portrait photography with these ten tips, you may find the following questions asked by other beginner portrait photographers useful.
More About Portrait Photography
When you’re learning about something, it’s natural for questions to arise. It’s a sign of a curious mind and critical thinking. Here are some of the top portrait photography questions from photographers just like you:
What are the 3 Types of Portrait Photography?
The three basic types of portrait photography are a standard portrait, an environmental portrait, and a creative portrait.
A standard portrait is what most people think of when they hear the term portrait – it includes the subject being centered in the shot and making eye contact with the camera.
In an environmental portrait, the subject may not be aware of the camera, may not be making eye contact with the lens, and their face may not be in the shot, establishing a relationship between the subject and their environment.
Lastly, a creative portrait is an intimate head-on shot where the subject makes eye contact with the camera lens. They are often captured near the end of the session as they require vulnerability by showing emotions in one’s face to feel meaningful.
What Makes a Good Portrait?
A good portrait draws attention to the subject and captures their character on film. A quality portrait is achieved through a combination of depth of field, composition, and lighting. It has been said that you can measure whether the person’s character has been captured in a portrait by whether you feel like you know something about the person after looking at the photo.

What is the Best Angle for Portrait Photography?
The most common angle in portrait photography meets the subject at eye level and shows the entire face head-on. This angle communicates confidence and openness. Other shots that focus on the face and shoulders include a 3/4 view, 2/3 view, and profile view. Many photographers allow the subject to look directly into the lens to create a sense of connection.
Whether the camera is positioned below or above the subject plays a role in the end result, as well. Shooting from below has a tendency to make the subject look authoritative while shooting from above creates the impression that the subject is small, which is best suited for photographing children.
Can a Portrait be Full Body?
Yes, this is called a full-body portrait. The opposite is also true: portraits that only depict the subject’s face and shoulders are called headshots. Similarly, a portrait can even feature multiple subjects. This is often the case with engagement and family photography.
When is the Best Time to Take Portrait Photos?
Portraits captured outdoors are best taken on overcast days, or in the shade on sunny days. Some photographers wait for the golden hour, which is generally an hour before sunset. When the sun begins to descend the sky for the night, this leads to a warm yellow natural light that is diffused and very flattering.
Finding your own Portrait Photography Style
It’s important to remember that portrait photography is as much of an art as it is a skill. After mastering some of the techniques and approaches outlined in this article, it’s up to you to hone your skill through trial and error. With time, you will find your individual style and know-how to replicate it with confidence across environments. Getting exposed to different subjects will also help you build soft skills with different ways to bring out the character of the individual and help it come through the final images.
No matter the subject, portrait photography is full of opportunities ready to be conquered, and each shoot is always a little different, just like your subjects.
Here are more amazing resources to improve your photography skills:
11 Types of Portrait Photography You Need in Your Repertoire
A Beginner’s Guide to Boudoir Photography
How to Name Your Photography Business